UPDATE: If you have PowerPoint 2016 for Mac please check here on how to update theme fonts:
http://bit.ly/1TmDX1r
If you have PowerPoint 2011 please see below:
I wanted to create a custom
Font Theme for a presentation template I was building but PowerPoint didn't have an option to create one. I was using a Mac and Office 2011 so i couldn't download the Theme Builder.
If you are on a PC you can download the theme builder here:
http://bit.ly/gTH2nP
Powerpoint allows users to create their own custom Colour Themes - which was handy but not what I wanted to change. Anyway after a bit of research into XML files I found a way to create a custom
Font Theme.
To do this for yourself you will need to know a little XML and you will need an XML editor of some sort.
I used Komodo Edit, you can download it from their website here:
http://bit.ly/dSYJ8J
I have created a video to walk through of the
Steps below, sorry there is no sound:
Step 1
You need a current
Font Theme XML file.
You can copy the code below and paste it into your XML editor and create your own XML file
OR
You can do a search for "office 2.xml" in the applications folder
OR
You can go to: Applications/Microsoft Office 2011/Office/Media/Office Themes/Theme Fonts/Office 2.xml
Copy the file on to your desktop, this will ensure you still have the original file if you make a mistake.
Here is the XML file you can copy, when using Komodo Edit create a new File from Template and select XML file:
<?xml version="1.0" encoding="utf-8" standalone="no"?>

<a:fontScheme name="Office 2" xmlns:a="http://schemas.openxmlformats.org/drawingml/2006/main">

<a:majorFont>

<a:latin typeface="Calibri"/>

<a:ea typeface=""/>

<a:cs typeface=""/>

<a:font script="Jpan" typeface="MS ゴシック"/>

<a:font script="Hang" typeface="맑은 고딕"/>

<a:font script="Hans" typeface="宋体"/>

<a:font script="Hant" typeface="新細明體"/>

<a:font script="Arab" typeface="Arial"/>

<a:font script="Hebr" typeface="Arial"/>

<a:font script="Thai" typeface="Cordia New"/>

<a:font script="Ethi" typeface="Nyala"/>

<a:font script="Beng" typeface="Vrinda"/>

<a:font script="Gujr" typeface="Shruti"/>

<a:font script="Khmr" typeface="DaunPenh"/>

<a:font script="Knda" typeface="Tunga"/>

<a:font script="Guru" typeface="Raavi"/>

<a:font script="Cans" typeface="Euphemia"/>

<a:font script="Cher" typeface="Plantagenet Cherokee"/>

<a:font script="Yiii" typeface="Microsoft Yi Baiti"/>

<a:font script="Tibt" typeface="Microsoft Himalaya"/>

<a:font script="Thaa" typeface="MV Boli"/>

<a:font script="Deva" typeface="Mangal"/>

<a:font script="Telu" typeface="Gautami"/>

<a:font script="Taml" typeface="Latha"/>

<a:font script="Syrc" typeface="Estrangelo Edessa"/>

<a:font script="Orya" typeface="Kalinga"/>

<a:font script="Mlym" typeface="Kartika"/>

<a:font script="Laoo" typeface="DokChampa"/>

<a:font script="Sinh" typeface="Iskoola Pota"/>

<a:font script="Mong" typeface="Mongolian Baiti"/>

<a:font script="Viet" typeface="Tahoma"/>

<a:font script="Uigh" typeface="Microsoft Uighur"/>

</a:majorFont>

<a:minorFont>

<a:latin typeface="Cambria"/>

<a:ea typeface=""/>

<a:cs typeface=""/>

<a:font script="Jpan" typeface="MS ゴシック"/>

<a:font script="Hang" typeface="맑은 고딕"/>

<a:font script="Hans" typeface="宋体"/>

<a:font script="Hant" typeface="新細明體"/>

<a:font script="Arab" typeface="Times New Roman"/>

<a:font script="Hebr" typeface="Times New Roman"/>

<a:font script="Thai" typeface="Angsana New"/>

<a:font script="Ethi" typeface="Nyala"/>

<a:font script="Beng" typeface="Vrinda"/>

<a:font script="Gujr" typeface="Shruti"/>

<a:font script="Khmr" typeface="MoolBoran"/>

<a:font script="Knda" typeface="Tunga"/>

<a:font script="Guru" typeface="Raavi"/>

<a:font script="Cans" typeface="Euphemia"/>

<a:font script="Cher" typeface="Plantagenet Cherokee"/>

<a:font script="Yiii" typeface="Microsoft Yi Baiti"/>

<a:font script="Tibt" typeface="Microsoft Himalaya"/>

<a:font script="Thaa" typeface="MV Boli"/>

<a:font script="Deva" typeface="Mangal"/>

<a:font script="Telu" typeface="Gautami"/>

<a:font script="Taml" typeface="Latha"/>

<a:font script="Syrc" typeface="Estrangelo Edessa"/>

<a:font script="Orya" typeface="Kalinga"/>

<a:font script="Mlym" typeface="Kartika"/>

<a:font script="Laoo" typeface="DokChampa"/>

<a:font script="Sinh" typeface="Iskoola Pota"/>

<a:font script="Mong" typeface="Mongolian Baiti"/>

<a:font script="Viet" typeface="Times New Roman"/>

<a:font script="Uigh" typeface="Microsoft Uighur"/>

</a:minorFont>

</a:fontScheme>
Step 2
You can now edit the XML.
You will only need to edit two parts:
Change '
Calibri' to the font you wish to use for the
Heading text.
<a:majorFont>

<a:latin typeface="Calibri"/>
AND
Change '
Cambria' to the font you wish to use for the
Body text.
<a:minorFont>

<a:latin typeface="Cambria"/>
Step 3
Save your XML Font Theme to:
[your username]/Library/Application Support/Microsoft/Office/User Templates/My Themes/Theme Fonts
Step 4
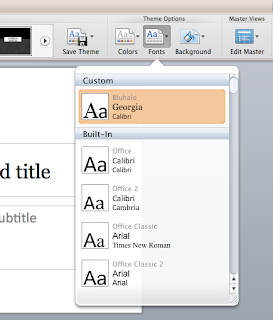
Now when you open PowerPoint you will see your custom Font Theme available.
You can see the one I created shown in the screenshot below:


